Key Takeaways
- Mark the stain, measure it from two exterior walls, and log when it leaks.
- Rule out plumbing, AC drain lines, and siding first.
- In the attic, follow the water trail uphill; the entry point is usually higher than the stain.
- Check pipe boots, chimneys, skylights, vents, and valleys where the trail ends.
- If you can’t find it, call a roofer.
Finding the source of a roof leak isn’t always easy, because water often enters at one point, runs along the wood and insulation, and drips somewhere else.
Take a breath. Most roof leaks start small, often with just a cracked pipe boot or a lifted piece of flashing. Catch it early, and you can usually limit the damage and keep a small repair from turning into a big one.
To find a roof leak, go into the attic above the wet spot and follow the water trail uphill to where it enters. That is usually around a vent pipe, chimney, skylight, or valley. If the attic doesn’t show it, you might need to run a hose test to recreate rain on one small section at a time. If you still can’t find the source, or finding it means climbing onto the roof, call a professional roofer.
Dealing with a leak right now? Start with the urgent steps below, then follow the guide to track down the source.
Roofing SOS: What Your Leak Looks Like and How Urgent It Is
Before you hunt for the source, look at what the leak is doing right now. A brown stain and a sagging ceiling call for very different first moves.
If There Is Water Near Lights, Fans, or Outlets:

Go to your breaker panel and switch off that circuit. Don’t flip the wall switch and don’t touch the fixture. Water and live wiring are the most dangerous combination in this whole situation, so handle this before anything else.
If you can’t tell which breaker controls that room, shut off the main breaker and call an electrician along with your roofer.
If There Is Ballooning or Bubbling in the Ceiling:
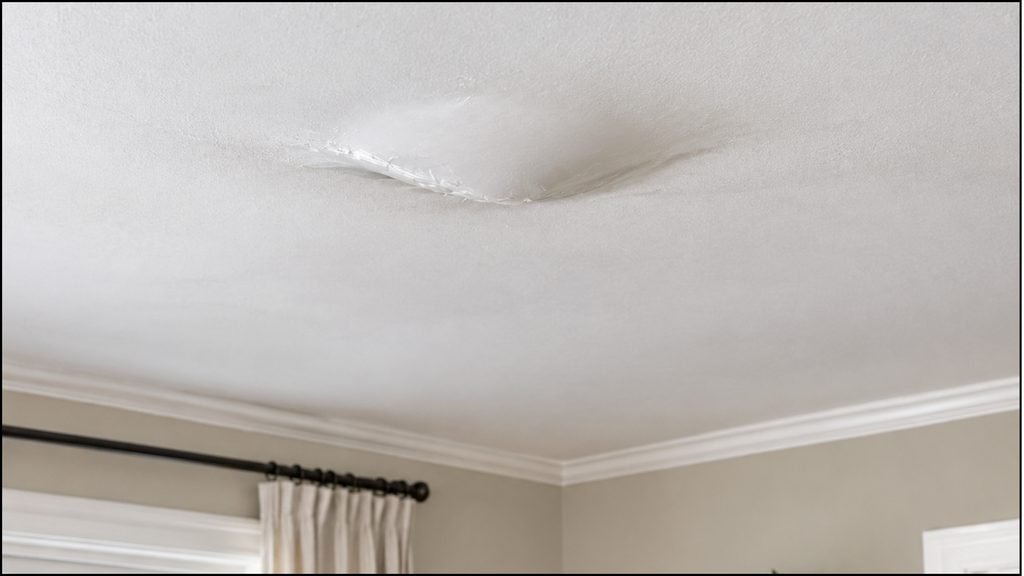
A bubble means water is pooling on top of your ceiling. Drywall soaked with water gets heavy and soft, and it can give way all at once.
- Keep people and pets away from under it. Don’t stand directly beneath it, even to look.
- Move furniture, rugs, and electronics out of the room, or cover what can’t move with plastic.
- Set a bucket or tub under the lowest point and lay towels or a tarp around it.
- Leave the room, close the door, and call a roofer.
Some people poke the bulge to drain it. We don’t recommend it. A ceiling that’s already failing can come down on you, and older ceilings and textures can contain materials you don’t want to disturb. A bucket and a closed door are the safer choice until a roofer arrives.
| A Redditor’s Bathroom Leak Story Comment by u/Glum-Blueberry-3870 from discussion in mildlyinfuriating |
If Water Is Actively Dripping:
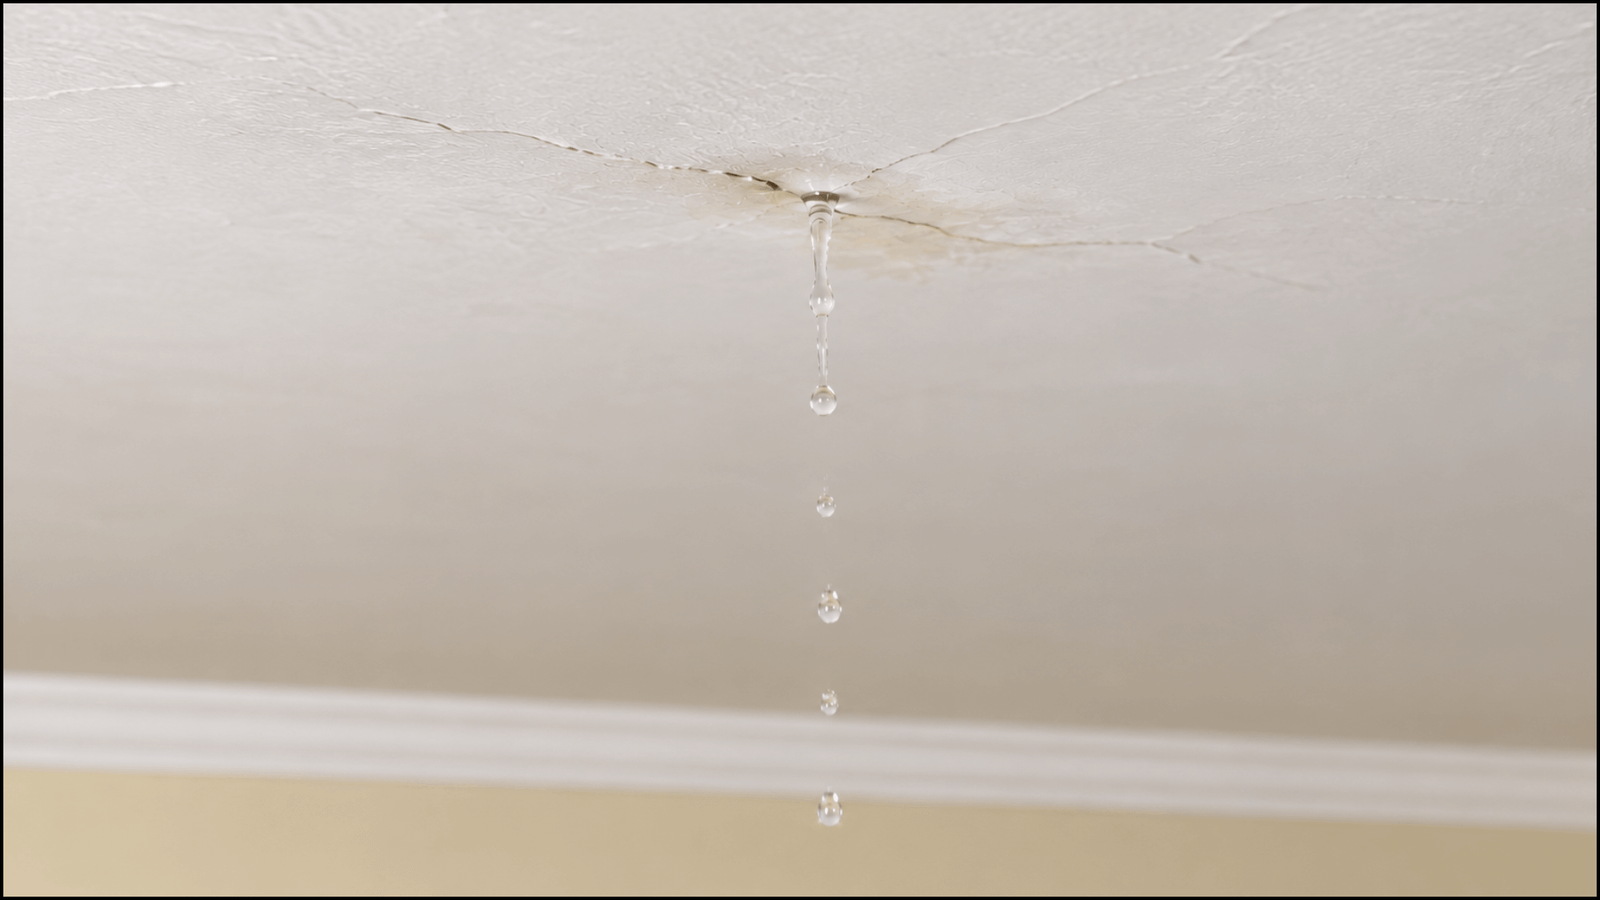
Move furniture and electronics away, then lay towels or a tarp across the floor. Put a bucket or large pot under the drip with a towel inside to cut the splashing, and empty it before it fills. Check it overnight if rain or snowmelt keeps going.
If it’s only a few drops, you can start looking for the source yourself. Going up on the roof alone is too risky and is better left to a trained roofer.
If there Is a Stain or Damp Spot With No Drip:
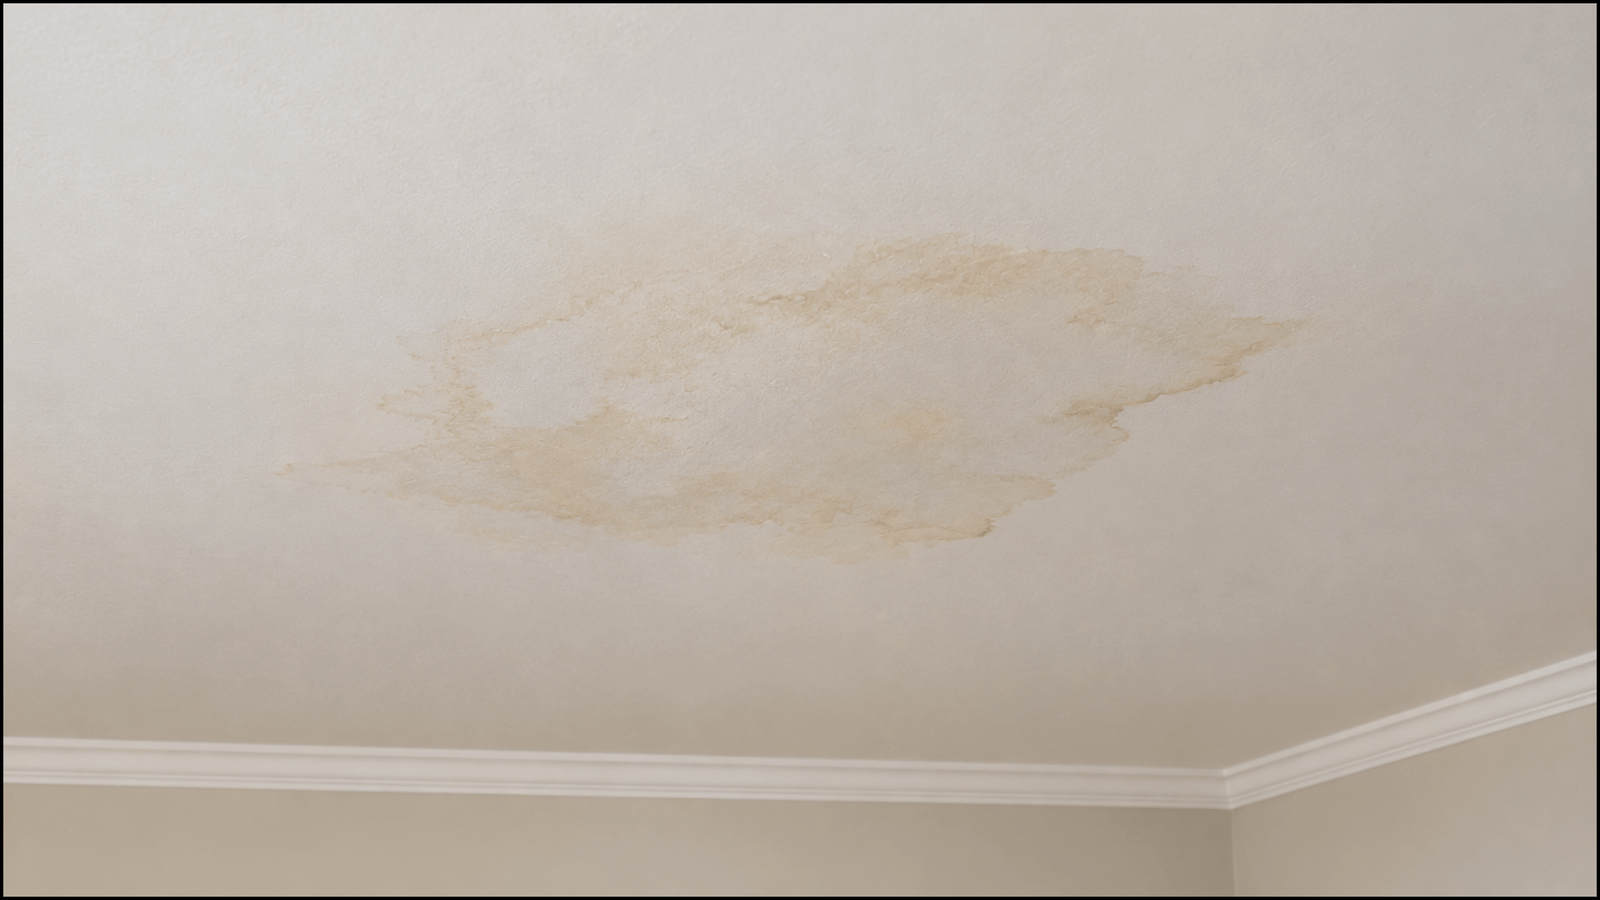
It is less urgent, but it isn’t harmless. Note when it showed up: during rain, after snow, on a very cold morning, or on a dry day. That one detail narrows down the cause faster than almost anything else. Step 1 shows you how to log it and what each pattern usually points to.
Don’t Ignore the Early Warning Signs!
Silent signs of roof damage can appear long before a small issue turns into a costly repair. Knowing what to look for can help you catch problems early.
Read 13 Hidden Signs of Roof Damage That Utah Homeowners Often Miss
Step-By-Step Instructions For Locating a Roof Leak
This guide assumes a pitched roof with shingles or metal panels. If you have a flat or low-slope roof, leaks behave differently and are harder to trace, so it’s best to call a roofer early.
Step 1: Mark, Measure, and Log the Leak
Once your home is safe and the buckets and tarps are down, record exactly where the water shows up. You’ll use this spot as your starting point in the attic, where everything looks the same, and it’s easy to get lost.
a). Outline the Stain and Photograph It
Trace its edge lightly in pencil and date it. If the stain grows past your line after the next rain or snowmelt, the leak is active. Take wide shots of the room and close-ups of every wet spot, stain, bulge, and damaged item. These photos help your roofer see how the leak behaved, and you’ll want them if you file an insurance claim. If there’s more than one wet spot, number them.
b). Measure It From Two Outside Walls
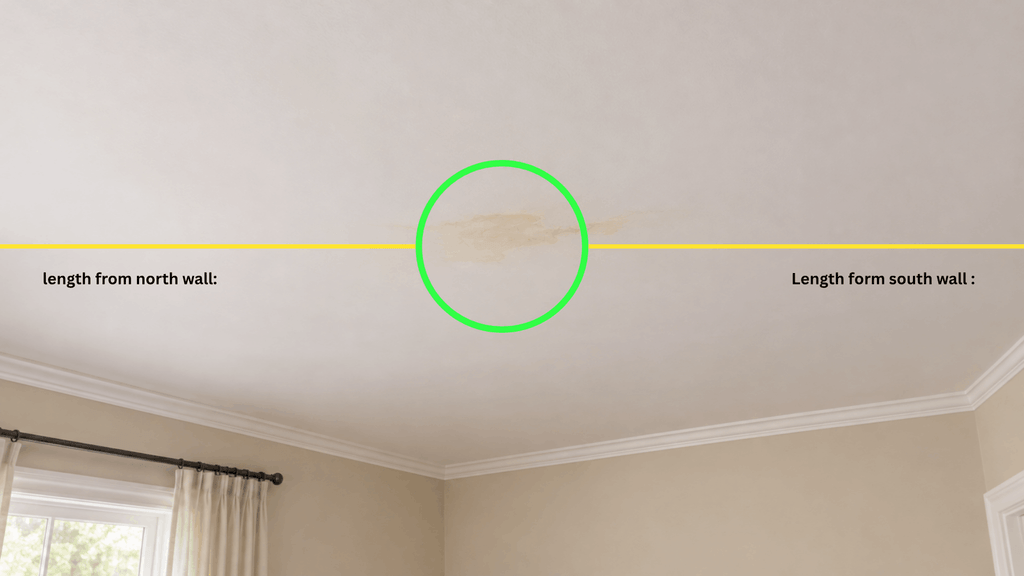
Measure from the wet spot to two exterior walls, for example, “6 feet from the north wall, 9 feet from the east wall.” Write it down. In the attic, you’ll measure the same distances from the same walls to land right above the stain.
If the leak is next to something that also goes through the ceiling, like a light fixture, bath fan, or vent, note that too. Those openings are easy to spot from the attic side.
c). Keep a Simple Leak Log
On your phone, write down the date, the weather, the wind direction, and where it dripped. Leaks that only show up under certain conditions are often the hardest to find, and the pattern tells you where to look first:
| When it leaks | What it often points to |
| Only during heavy rain | Flashing, a cracked pipe boot, skylight or chimney seals, damaged shingles |
| Only with wind-driven rain from one direction | Exposed fasteners, siding or window flashing, chimney or wall joints |
| Days after snow, as it melts | An ice dam or failed flashing |
| Cold mornings with no rain or snow | Condensation in the attic |
| Dry days | Plumbing, an AC drain line, or a bathroom fan duct |
These are starting points, not a diagnosis. The steps below confirm which one you have.
Filing an Insurance Claim After Storm Damage?
Proper documentation can make a difference when dealing with an insurance claim. Learn how a professional roof inspection documents storm damage.
Read: Storm Damage Roof Inspection & Documentation in Utah: What We Look For and How We Record It
Step 2: Rule Out Plumbing and Siding
Not every ceiling leak comes from the roof. Before you climb into the attic, run a few quick tests to rule out the usual suspects.
a) Water Meter Test
Turn off every faucet, toilet, and appliance, then look at your water meter. If the dial is still moving, water is escaping from a pipe somewhere. Shut off the main water valve and call a plumber.
This test is especially useful if the ceiling leak is directly below a bathroom, kitchen, or laundry room, where supply and drain pipes may be hidden. If the leak appears even on dry days, plumbing is a likely cause.
b). AC Drain Line Check
If your air handler or furnace sits in the attic, its condensate drain line can clog and overflow in summer, leaving a stain that looks like a roof leak. If the stain is below the unit and appears on hot days, check the drain line or have an HVAC technician inspect it.
c). Window and Siding Hose Test
If the leak is near an outside wall, spray water only on the window or siding below the roofline for 10 minutes while someone watches inside. Keep the water off the roof. If the ceiling or wall gets wet, the problem is the window flashing or siding, not the roof.
Step 3: Search the Attic
The attic is where most roof leaks get found. You’re looking at the underside of the exact spot where water gets in, before it soaks into insulation and travels to your ceiling. But an attic with an active leak can also hold hazards, so check before you climb in.
Gear to bring: A bright flashlight or headlamp, an N95 mask, gloves, long sleeves, eye protection, your phone for photos, and a tape measure. Tell someone in the house you’re going up.
a) Check That Your Attic Is Safe to Enter
Open the hatch, shine a flashlight in, and look around before you put any weight inside.
- Mold. Look for black, green, or white fuzzy patches on the wood, and notice any strong musty smell. If you see more than a small patch, or anyone in the house has asthma or allergies, don’t go in. Mold cleanup is a job for a professional.
- Soft or rotted wood. Dark, crumbly, or sagging roof decking means water has been getting in for a while. Don’t put weight near it.
- Wet wiring. If water is running near wires, junction boxes, or light fixtures in the attic, stay out and turn off that circuit.
- Insulation type. Most attics along the Wasatch Front have fiberglass or cellulose insulation. Fiberglass irritates skin, eyes, and lungs, so cover up. If you see loose, pebble-like gray-brown or silver-gold insulation, it may be vermiculite. The EPA says to assume vermiculite contains asbestos and not disturb it. If that’s what you have, don’t dig through it. Call a professional.
- Heat. Utah attics can get dangerously hot on summer afternoons. Go up early in the morning.
b) Move Safely Through the Attic
- Step only on the wooden joists, or lay a sturdy board across them to kneel on. The drywall between the joists won’t hold you, and a foot through the ceiling is a common way this job goes wrong.
- Watch your head. Roofing nails poke through the underside of the deck everywhere.
- Move slowly and keep three points of contact when you shift position.
c) Find the Wet Area Above Your Mark
Use the measurements from Step 1 to find the spot directly above your ceiling stain. Then check the insulation there.
Wet insulation looks darker, matted down, or clumped, and it can feel cold or damp through your gloves. Gently pull it back to look at the top of the drywall. A water stain or wet patch tells you that you’re in the right place.
Wet insulation loses much of its insulating ability and traps moisture against your ceiling. Note how much is wet, because it will need drying or replacing. The EPA’s guidance is to dry wet materials within 24 to 48 hours to keep mold from taking hold.
d) Follow the Water Trail Uphill
This is the most important part of the search. Water rarely drips straight down. It gets in at one point, then runs along the underside of the roof deck and down the rafters until it finds a low spot to fall from.
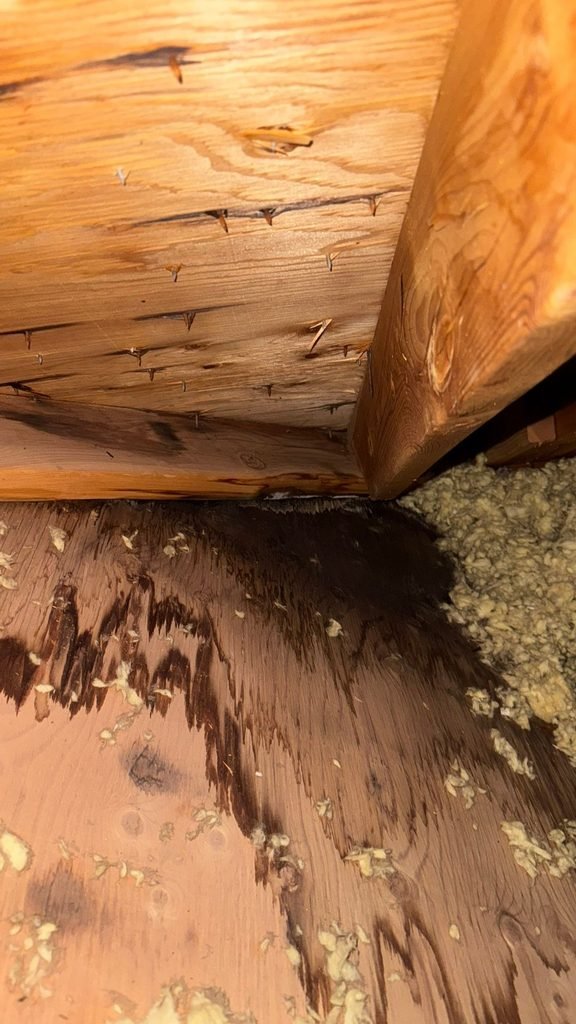
Start above your stain and look up toward the peak of the roof for:
- Dark stains or tide lines on the rafters and roof deck
- Shiny, damp, or darker wood
- Drip marks, rust around nails, or white mineral streaks
- Water trails that run along a rafter
Follow them uphill. The real entry point is often several feet up the slope from where water landed on your ceiling. Photograph each spot as you go.
e) Check What Passes Through the Roof at That Spot
When the trail stops, look at what goes through the roof right there. Most leaks start where something breaks through the roof surface or where two surfaces meet, not in the middle of open shingles.
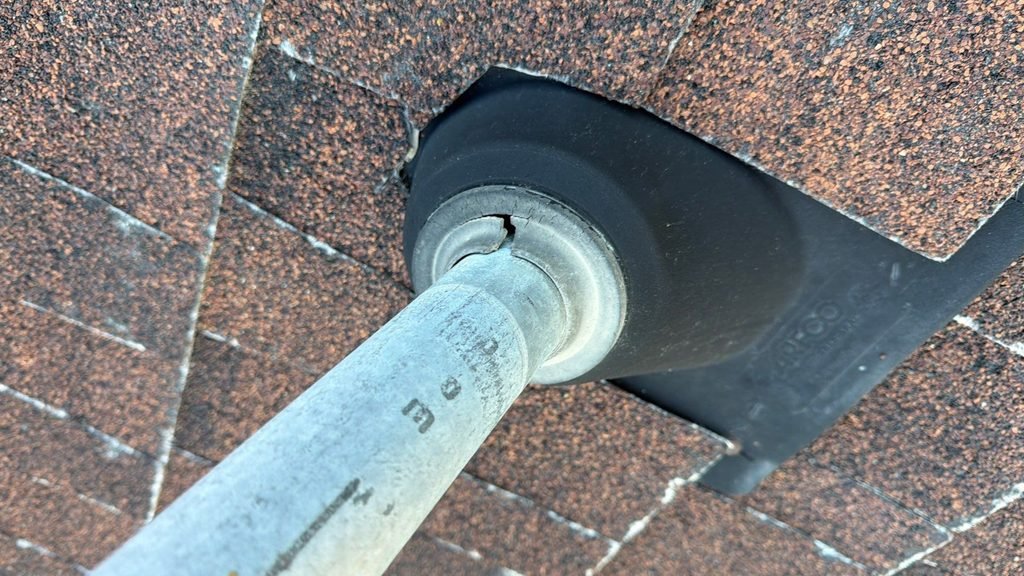
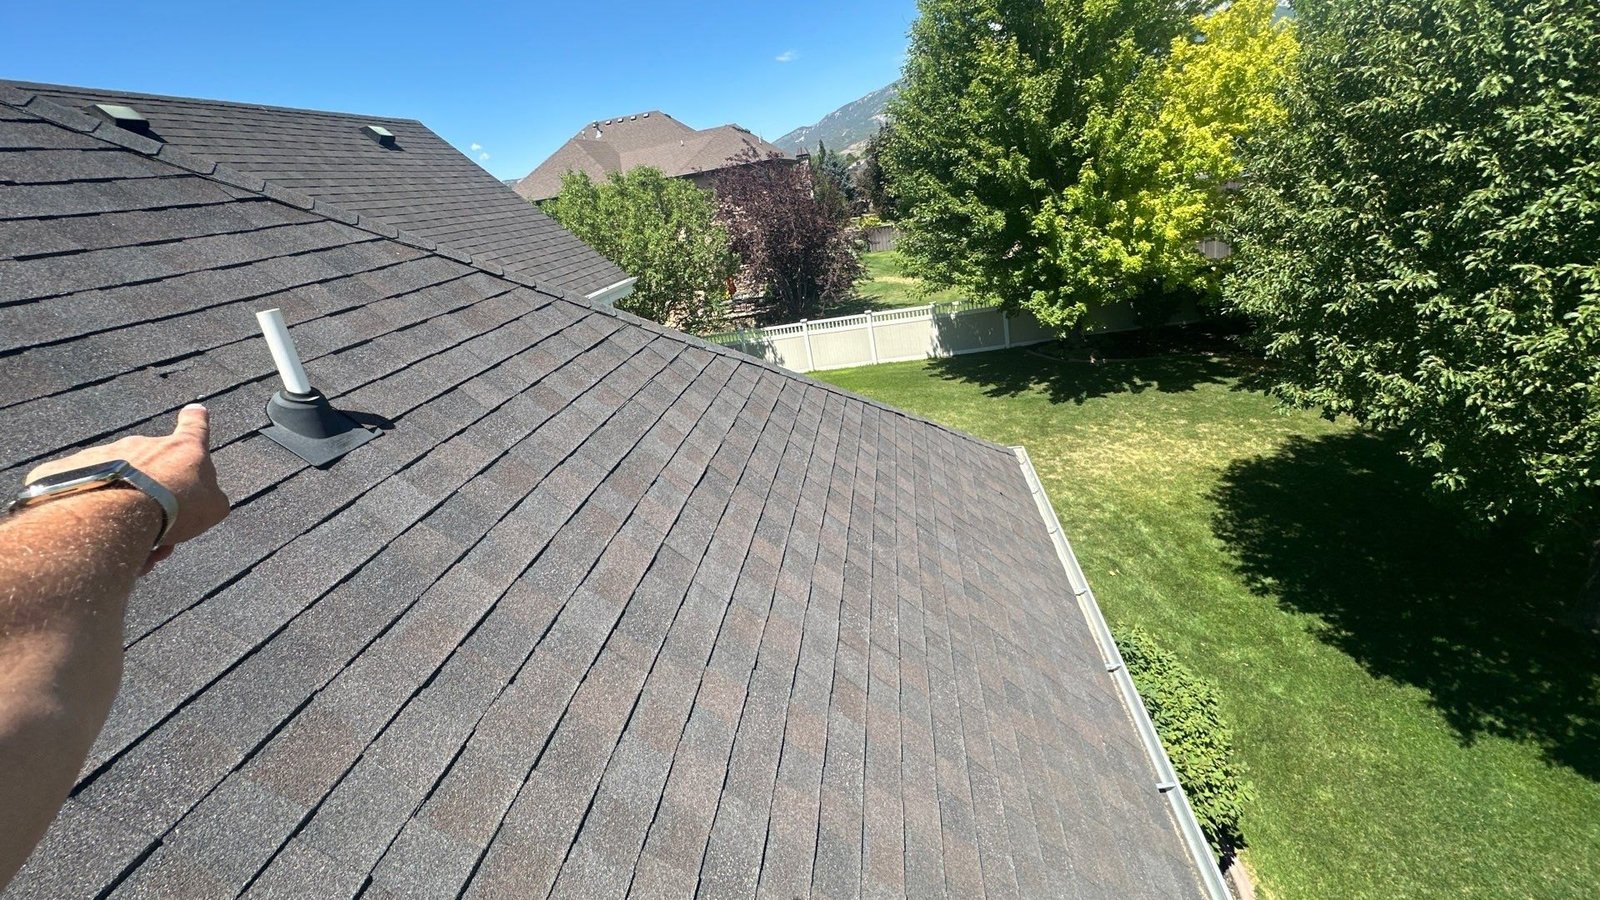
- Plumbing vent pipe: The rubber boot around the pipe cracks with age. Utah’s high-altitude sun and freeze-thaw cycles wear it out faster. Look for wet wood around the pipe.
- Bathroom or kitchen exhaust vent: Look for gaps around the vent hood or a disconnected duct.
- Furnace or water heater flue: Look for rust or gaps around the metal collar.
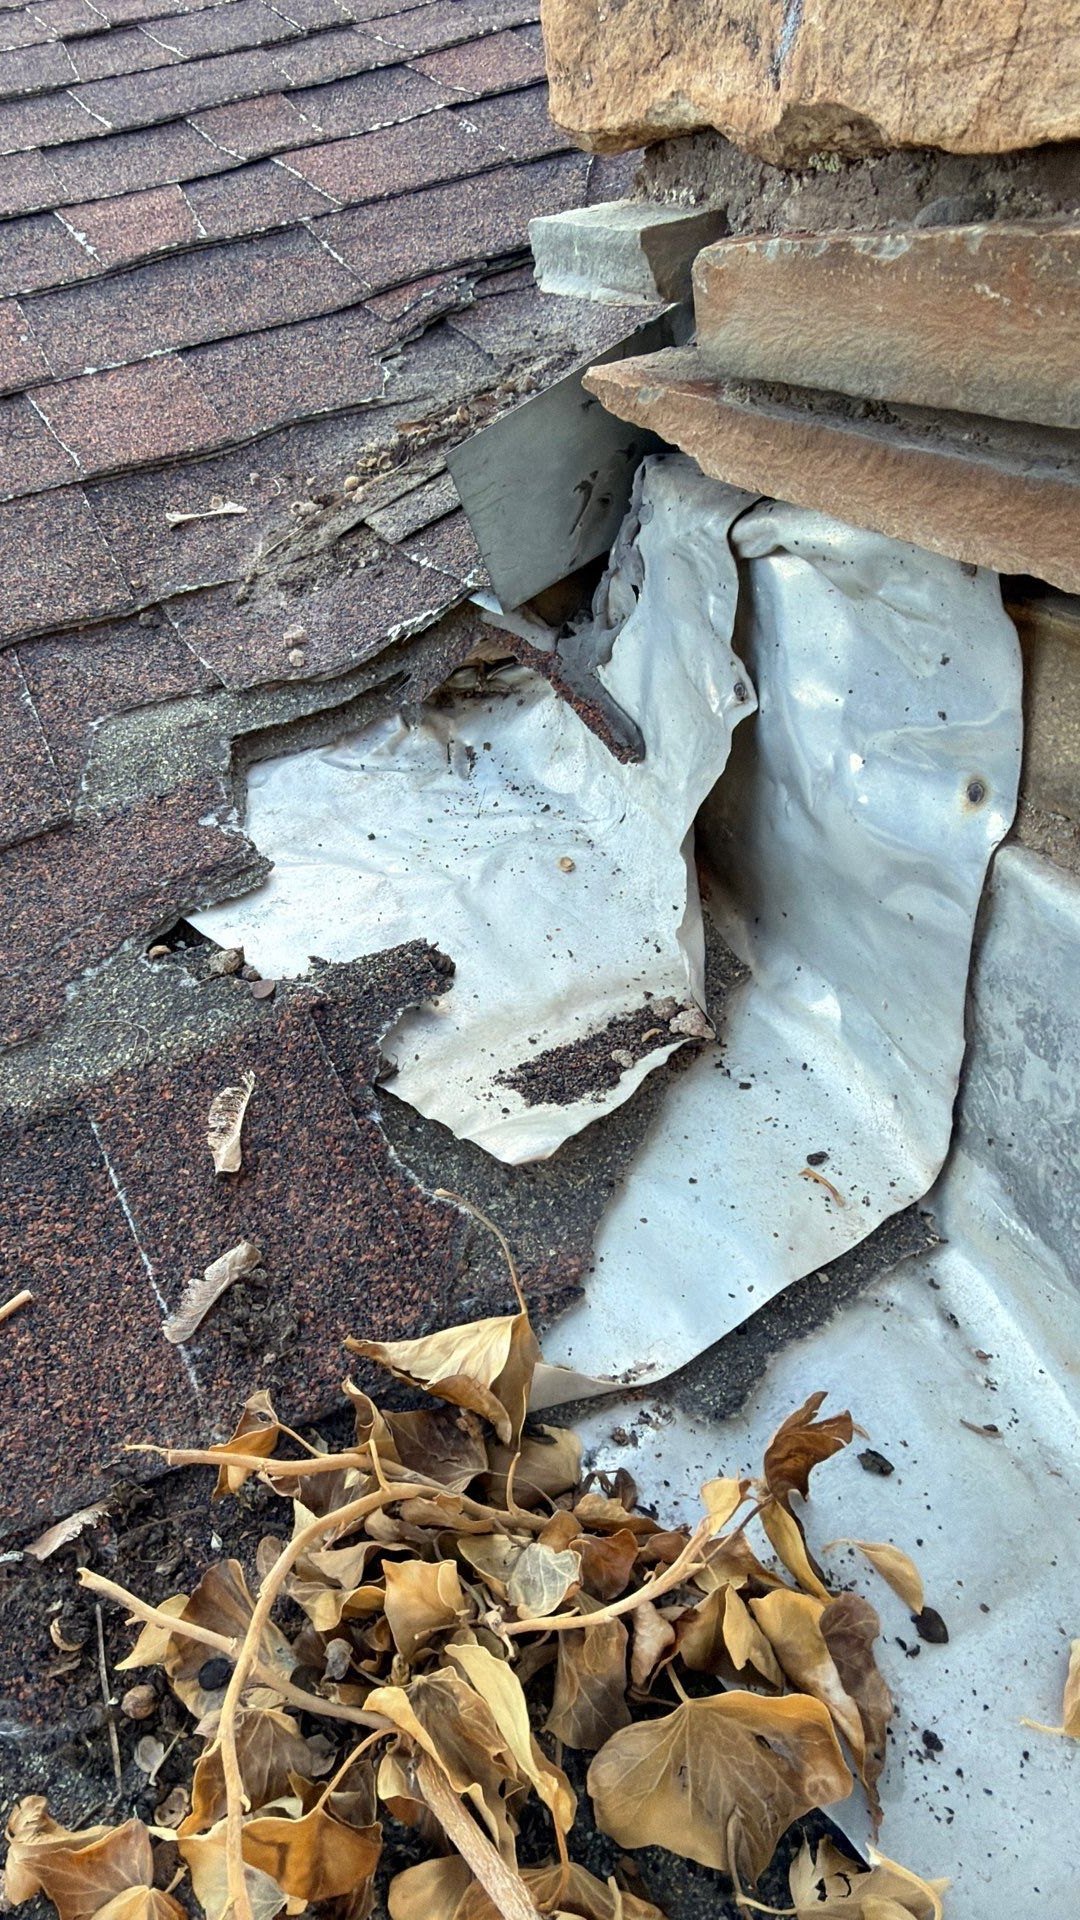
- Chimney or skylight: Look for water running down the framing around the opening, which points to failed flashing.
- Valleys, dormers, and wall joints: Where two slopes meet, or where a roof meets a wall, look for a wet line running down the joint. Step flashing in these spots is a common failure point.
- Solar or satellite mounts: Each mount is a hole in the roof. Look for wet wood around the base.
- Exposed fasteners and nail pops: Nails that have backed out, or screws with worn washers on a metal roof, let water in around the shaft.
- Hail or wind damage: Bruised, cracked, or missing shingles on the slope above the trail.
- Swamp cooler: If you have a roof-mounted evaporative cooler, check the curb it sits on and the duct opening. These leak often, and an uncovered duct lets snow in during winter.
Mark the spot with tape or a marker so a roofer can find it from inside.
Should You Run a Hose Test on Your Roof?
If the attic didn’t show you the entry point, a hose test recreates rain on one small section at a time until the leak shows itself. It works, but it is risky and involves a ladder and roof access.
This is where most homeowner injuries happen. A trauma study from the University of Massachusetts found that nonprofessionals injured doing roof and tree work around their own homes outnumbered injured professionals almost 3 to 1 at a single trauma center: 129 homeowners against 45 pros. Nearly half of the homeowners had head injuries, and about a third needed rehab, home care, or a nursing facility after leaving the hospital.
Stay off the roof. Run this test from the ground or a stable ladder, only if you’re comfortable on one.
When It’s Safe to Run a Hose Test
Only run a hose test when all of these are true:
- The roof is dry, and it hasn’t rained or snowed in the last day or two, so any new water you see is from the hose.
- It’s above freezing and will stay that way. In a Utah winter, hose water can freeze on shingles, gutters, and ladder rungs within minutes.
- There’s no snow or ice on the roof.
- It’s daylight, and there are two of you, one in the attic and one on the hose, with phones to talk.
If your roof is steep, two stories high, or you’re not comfortable on a ladder, stop here. This is the part to hand to a roofer.
Test One Section at a Time, From the Bottom Up
- Your helper sits in the attic at the spot you marked in Step 3, with a flashlight, watching the wood and insulation.
- From the ground, start low. Use a gentle, steady stream from a garden hose, not a pressure washer, on the lowest section near the leak area, usually the eave or gutter line. High pressure can force water under healthy shingles and send you chasing a false leak.
- Soak one area for 5 to 10 minutes before moving on. Slow leaks can take a while to show up.
- Move up in small zones that you can reach safely from the ground, such as the eave, gutter line, and lower shingles.
- Stop the moment your helper sees water. The last zone you soaked is the likely leak area, though water can travel, so confirm it with the attic trail.
Don’t spray the whole roof at once. If you do, you’ll learn that water gets in, but not where.
A smart tip for hose testing:
Before you start the hose, have your helper tape dry paper towels to the wood around each suspect spot in the attic: the vent pipe, the rafters along the water trail, the nail tips near the stain. Label each one with a marker.
When the hose runs, the first paper towel that turns wet shows you exactly which spot is letting water in. It’s cheap, simple, and far more precise than watching for a drip in a dark attic.
A controlled hose test from the ground level only clears the lower roof; anything higher is a roofer’s job.
Extra Tests for Hard-to-Find Roof Leaks
Some leaks only show up in certain weather, or travel so far that the trail goes cold. These simple tests help you narrow down a stubborn one.
Snowmelt Pattern Test
This is a Utah-friendly test you can do from the street. A day or two after a snowfall, look at your roof and compare it to your neighbors’. Bare patches or streaks where snow melted early show where heat is escaping from your home into the attic.
That heat melts snow higher on the roof, and the water refreezes at the cold roof edge into an ice dam. If your leak is near an outside wall after the snow and you see melt patches and thick ice along the gutters, an ice dam is likely the cause. Pull snow off the bottom 3 to 4 feet of the roof with a roof rake from the ground, and don’t chip the ice, as it damages shingles. The lasting fix is to air-seal and insulate the attic, so heat stops reaching the roof.
From the ground, you can also scan the roof with binoculars for missing or curled shingles, a damaged chimney cap, or debris piled in a valley.
Moisture Meter Test
An inexpensive pin-type moisture meter from any hardware store reads how wet drywall and wood are. First, take a reading on dry drywall elsewhere in the same room, so you know your baseline. Then take readings in a grid across the stained ceiling, or along the rafters in the attic, and write the numbers down. Readings climb as you get closer to where water is entering, so mapping them shows you which direction it’s coming from, even when nothing looks wet.
What a Roofer Checks That You Shouldn’t Try Yourself
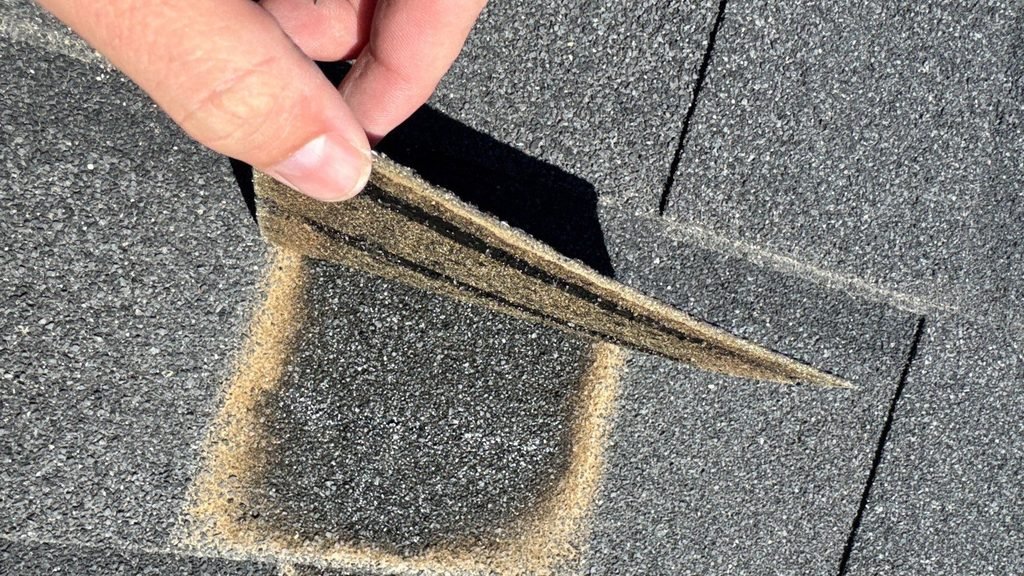
Some of the most common leak sources can only be confirmed up close on the roof surface: cracked pipe boots, lifted shingle edges, dried-out sealant, and worn flashing. A roofer works with fall protection and may also use thermal imaging or moisture mapping to find leaks that a visual check misses.
Still Can’t Find the Source of Your Roof Leak?
If you’d rather not climb into the attic, or you’ve looked and still can’t find it, that’s when a roofer’s tools and experience save you time and money.
Rooval Roofing is a family-owned roofing company serving Salt Lake, Davis, and Utah counties. We offer a free, no-obligation roof inspection and provide photos that show what’s causing the leak and what it will take to fix it. On an inspection, we check:
- The attic underside and insulation above the stain
- Flashing at chimneys, skylights, valleys, and wall joints
- Pipe boots, exhaust vents, and flue collars
- Shingle condition, exposed fasteners, and storm damage
Frequently Asked Questions
We recommend against it. A bulge means the drywall is holding a lot of water, and poking it can bring the ceiling down on you or hit wiring above it. Leave the room, put a bucket under the lowest point, close the door, and call a roofer.
Yes, and it usually is. Water enters at one point, then runs along the underside of the roof deck and down the rafters before it drips onto your ceiling. The real entry point is often several feet uphill from the stain, which is why you follow the water trail up toward the roof peak.
A roof leak usually makes one wet area that shows up during rain or snowmelt. Condensation makes frost or water droplets on many nail tips across the whole attic, mostly on very cold days or right after a cold snap. If it’s condensation, you need air sealing, insulation, and ventilation, not a roof repair.
No, stay out if you see widespread mold, sagging decking, or wet wiring; if anyone in the house has asthma, or if the insulation looks like vermiculite, which the EPA says to leave undisturbed.
It can slow a leak for a short time, but it often hides the real entry point and traps moisture under the patch. Find the source first, then have it repaired properly so the fix lasts through Utah’s freeze-thaw cycles.